Celia Garcia Marquez
January 21, 2021
Configurar HTTPS en Centos 8 (Quijote)
Warning: This information may be outdated. Please note the date of the post.
1. Creación de un certificado SSL Wilcard
Concepto: ¿Qué es un certificado SSL Wilcard?
Es un certificado que protege la dirección URL de un sitio web, así como también sus subdominios.
Crear clave privada y certificado
El certificado principalmente se va a generar en Freston, nuestra máquina donde tenemos configurado el DNS de nuestro escenario.
- Generar la clvave privada:
openssl genrsa 4069 > /etc/ssl/private/wc_private.key
- Generar el certificado:
root@freston:/home/debian# openssl req -new -key /etc/ssl/private/wc_private.key -out /home/debian/wc_celia.csr
You are about to be asked to enter information that will be incorporated
into your certificate request.
What you are about to enter is what is called a Distinguished Name or a DN.
There are quite a few fields but you can leave some blank
For some fields there will be a default value,
If you enter '.', the field will be left blank.
-----
Country Name (2 letter code) [AU]:ES
State or Province Name (full name) [Some-State]:Sevilla
Locality Name (eg, city) []:Dos Hermanas
Organization Name (eg, company) [Internet Widgits Pty Ltd]:IES Gonzalo Nazareno
Organizational Unit Name (eg, section) []:Informatica
Common Name (e.g. server FQDN or YOUR name) []:*.celia.gonzalonazareno.org
Email Address []:

Please enter the following 'extra' attributes
to be sent with your certificate request
A challenge password []:
An optional company name []:
Enviar dicho certificado a la autoridad certificadora y esperar a que lo firmen. Debamos obtener un fichero.crt firmado y el de la autoridad certificadora, que en este caso es: gonzalonazareno.crt, que nos hemos bajado de gestiona.
Los certificados deben estar alojados en /etc/ssl/certs, y la clave privada en /etc/ssl/private.
2. Configurar https en Quijote
Ubicamos la clave privada en el lugar correcto /etc/pki/tls/private
Ubicamos el certificado firmado en el lugar correcto /etc/pki/tls/certs
Comprobamos los permisos:
[centos@quijote ~]$ ls -l /etc/pki/tls/private/
total 8
-rw-------. 1 root root 3247 Nov 30 22:28 postfix.key
-rw-------. 1 root root 3215 Jan 18 12:11 wc_private.key


[centos@quijote ~]$ sudo ls -l /etc/pki/tls/certs/
total 16
lrwxrwxrwx. 1 root root   49 Nov 30 22:25 ca-bundle.crt -> /etc/pki/ca-trust/extracted/pem/tls-ca-bundle.pem
lrwxrwxrwx. 1 root root   55 Nov 30 22:25 ca-bundle.trust.crt -> /etc/pki/ca-trust/extracted/openssl/ca-bundle.trust.crt
-rw-r--r--. 1 root root 2216 Nov 30 22:28 postfix.pem
-rw-r--r--. 1 root root 9965 Jan 18 12:11 wc_celia_sign.crt
Previamente tendremos que tener instalado apache y el sitio web funcionando, como hemos hecho en el siguiente post.ç
Instalamos el módulo de https de apache
sudo dnf install mod_ssl
- Tenemos que reiniciar el servicio:
sudo systemctl restart httpd
- Creamos el fichero de configuración de nuestro virtualhosts para https (en mi caso he copiado el archivo de configuración inicial y lo he editado), de forma que, le agregamos las líneas pertinentes para habilitar https, indicando la ruta del certificado, clave privada y además ponemos en escucha al puerto 443.
/etc/httpd/sites-available/https.celia.gonzalonazareno.org.conf
<VirtualHost *:443>
    ServerName www.celia.gonzalonazareno.org
    DocumentRoot /var/www/iesgn
    ErrorLog /var/www/iesgn/log/error.log
    CustomLog /var/www/iesgn/log/requests.log combined

        <Proxy "unix:/run/php-fpm/www.sock|fcgi://php-fpm">
                ProxySet disablereuse=off
        </Proxy>

        <FilesMatch \.php$>
                SetHandler proxy:fcgi://php-fpm
        </FilesMatch>

    SSLEngine on
    SSLCertificateFile /etc/pki/tls/certs/wc_celia_sign.crt
    SSLCertificateKeyFile /etc/pki/tls/private/wc_private.key

</VirtualHost>
- En el fichero de configuración inicial de nuestro sitio web, vamos a editarlo y crear una redirección se acceda por el otro virtualhost y utilice https.
/etc/httpd/sites-available/celia.gonzalonazareno.org.conf
<VirtualHost *:80>
    ServerName www.celia.gonzalonazareno.org
    DocumentRoot /var/www/iesgn
    ErrorLog /var/www/iesgn/log/error.log
    CustomLog /var/www/iesgn/log/requests.log combined

    Redirect permanent / https://www.celia.gonzalonazareno.org
</VirtualHost>
¡! Es recomendable deshabilitar selinux, se puede deshabilitar en /etc/selinux/config
# This file controls the state of SELinux on the system.
# SELINUX= can take one of these three values:
#     enforcing - SELinux security policy is enforced.
#     permissive - SELinux prints warnings instead of enforcing.
#     disabled - No SELinux policy is loaded.
SELINUX=disabled
# SELINUXTYPE= can take one of three values:
#     targeted - Targeted processes are protected,
#     minimum - Modification of targeted policy. Only selected processes are protected.
#     mls - Multi Level Security protection.
SELINUXTYPE=targeted
3. Agregar regla de iptables
Tenemos que agregar la regla de iptables para que se pueda usar https
iptables -A OUTPUT -p tcp -m tcp --dport 443 -j ACCEPT

sudo iptables -t nat -A PREROUTING -p tcp --dport 443 -i eth0 -j DNAT --to 10.0.2.4:443
- Vemos las reglas aplicadas
debian@dulcinea:~$ sudo iptables -t nat -L -nv
Chain PREROUTING (policy ACCEPT 0 packets, 0 bytes)
 pkts bytes target     prot opt in     out     source               destination
    6   360 DNAT       tcp  --  eth0   *       0.0.0.0/0            0.0.0.0/0            tcp dpt:80 to:10.0.2.4:80
    6   360 DNAT       tcp  --  eth0   *       0.0.0.0/0            0.0.0.0/0            tcp dpt:443 to:10.0.2.4:443

Chain INPUT (policy ACCEPT 0 packets, 0 bytes)
 pkts bytes target     prot opt in     out     source               destination

Chain POSTROUTING (policy ACCEPT 0 packets, 0 bytes)
 pkts bytes target     prot opt in     out     source               destination
  202 15404 MASQUERADE  all  --  *      eth0    10.0.1.0/24          0.0.0.0/0
   30  1896 MASQUERADE  all  --  *      eth0    10.0.2.0/24          0.0.0.0/0

Chain OUTPUT (policy ACCEPT 0 packets, 0 bytes)
 pkts bytes target     prot opt in     out     source               destination
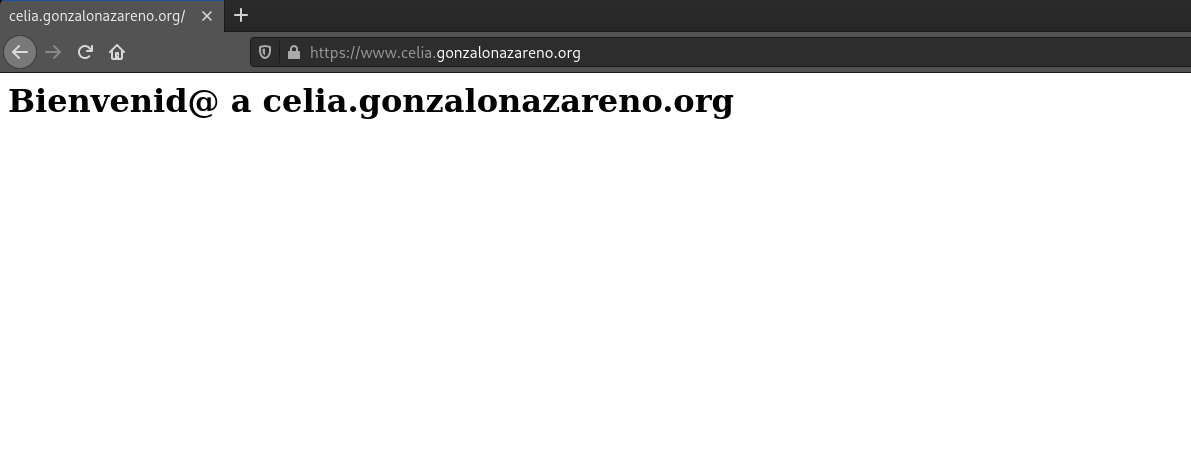
4. Funcionamiento
- Ahora solo tendríamos que reiniciar el servicio de httdp y comprobar que funciona. Es posible que se deba de reinciar la máquina ya que hemos deshabilitado el sellinux.
Recuerda que el /etc/resolv.conf tiene que apuntar a la ip flotante de dulcinea.
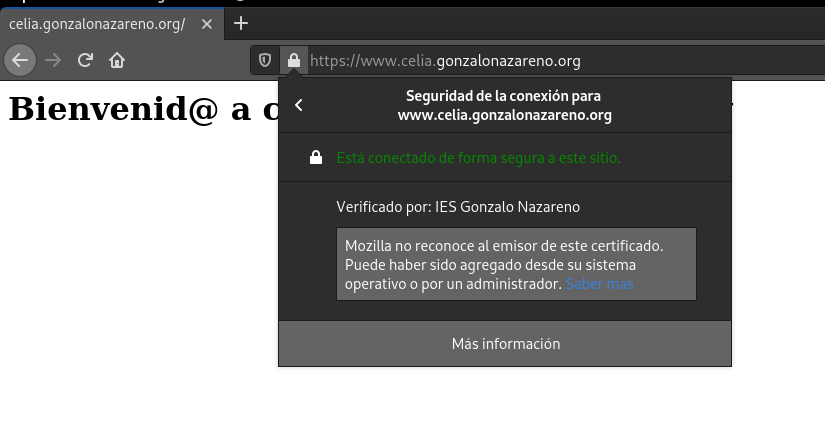
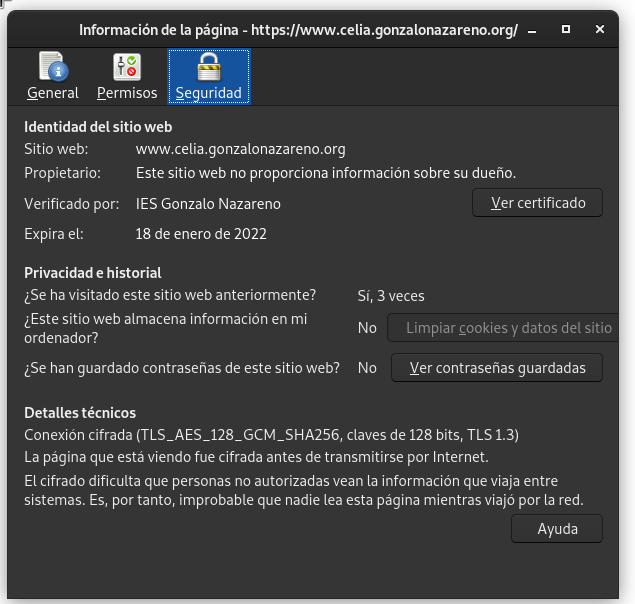
Comprobamos que funciona y que estamos en un sitio seguro